테스트를 위해 AWS MarketPlace에 NetApp BlueXP Connector 설치 후 로컬 단말기에 구성된 쿠버네티스 클러스터와 연동
Trident 설치
1. Trident 설치 패키지 다운로드
wget https://github.com/NetApp/trident/releases/download/v24.10.0/trident-installer-24.10.0.tar.gz
tar -xf trident-installer-24.10.0.tar.gz
cd trident-installer2. Trident CRD 생성
kubectl apply -f deploy/crds/trident.netapp.io_tridentorchestrators_crd_post1.16.yaml3. Trident Operator 배포
kustomize를 이용해 배포할 operator의 매니페스트 파일을 bundel_port_1_25.yaml 파일에 업데이트한다. 쿠버네티스의 버전이 1.25 이후의 버전인 경우 kustomization_post_1.25.yaml 파일로 kustomization.yaml 파일을 업데이트해야 한다.
- 네임스페이스 생성
kubectl apply -f deploy/namespace.yaml- Operator 배포
cp deploy/kustomization_post_1_25.yaml deploy/kustomization.yaml
kubectl kustomize deploy/ > deploy/bundle_post_1_25.yaml
kubectl apply -f deploy/bundle_post_1_25.yaml4. Trident Orchestrator 생성
kubectl apply -f deploy/crds/tridentorchestrator_cr.yaml5. 배포 결과 확인
kubectl get torc trident
kubectl describe torc trident
kubectl get po -n trident
사설 레지스트리 사용 시 업데이트 필요한 정보
1. Trident 관련 이미지 파일 및 목록
아래 이미지 목록을 다운로드 받은 후 사설 레지스트리로 이미지 업로드 필요
| File Name | Image Name | Description |
| deploy/operator.yaml | · netapp/trident-operator:24.10.0 | Trident 이미지 |
| deploy/crds/tridentorchestrator_cr.yaml | · netapp/trident:24.10.0 · netapp/trident-autosupport:24.10 |
Trident 이미지 |
| · registry.k8s.io/sig-storage/csi-provisioner:v5.1.0 · registry.k8s.io/sig-storage/csi-attacher:v4.7.0 · registry.k8s.io/sig-storage/csi-resizer:v1.12.0 · registry.k8s.io/sig-storage/csi-snapshotter:v8.1.0 |
CSI 이미지 |
2. Operator 이미지 레지스트리 업데이트 위치
deploy/operator.yaml 파일을 열어 이미지 레지스트리 위치 값을 업데이트한다.
apiVersion: apps/v1
kind: Deployment
metadata:
  name: trident-operator
  namespace: trident
  labels:
    app: operator.trident.netapp.io
spec:
	...
    spec:
      serviceAccountName: trident-operator
      containers:
        - name: trident-operator
          image: netapp/trident-operator:24.10.0	# 사설 레지스트리 정보로 변경
...3. Orchstrator 이미지 레지스트리 업데이트 위치
deploy/crds/tridentorchestrator_cr.yaml 파일을 열어 Trident, AutoSupport, CSI 이미지 레지스트리 정보를 업데이트한다.
apiVersion: trident.netapp.io/v1
kind: TridentOrchestrator
metadata:
  name: trident
spec:
  debug: true
  namespace: trident
  imagePullPolicy: IfNotPresent
  windows: false
  cloudProvider: ""
  # 아래의 세 줄을 추가한다.
  imageRegistry: "<PRIVATE_REGISTRY_URL>"		# CSI 이미지 URL
  autosupportImage: "<PRIVATE_REGISTRY_URL>/netapp/trident-autosupport:24.10"
  tridentImage: "<PRIVATE_REGISTRY_URL>/netapp/trident:24.10.0"
NetApp NAS CSI 구성 (쿠버네티스 클러스터와 NetApp NAS 연동)
연동을 위한 NetApp 접속정보를 확인해야 한다. 이 정보는 NetApp과 연동을 위해 Backend Config 설정에 반영한다.
1. NetApp 접속 정보 확인
테스트를 위해 AWS MarketPlace에서 NetApp NAS 구성 후 연동을 위한 테스트를 진행할 경우 접속 정보 확인하는 방법이다.
- NetApp Console Web UI 접속 → Canvas → Mount → Working Environment Information 에 접속 후 IP 정보 확인
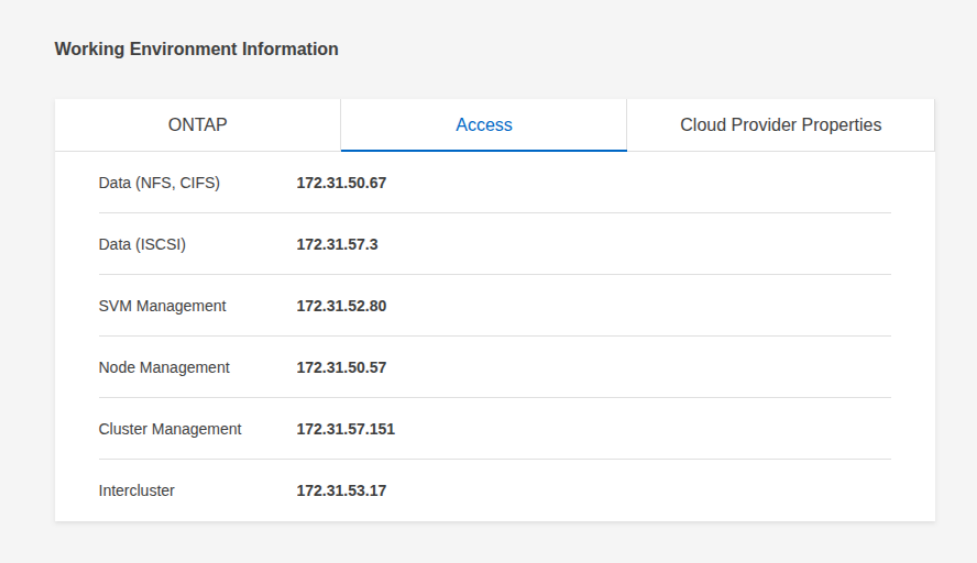
- https://<SVM_MANAGEMENT_IP>/api/svm/svms 에 접속 후 SVM 계정 정보 확인
2. Backend Config 매니페스트 파일 수정
apiVersion: v1
kind: Secret
metadata:
  name: backend-tbc-ontap-nas-secret
type: Opaque
stringData:
  username: vsadmin				# connector, volume 생성과정에서 지정한 계정 또는 vsadmin 값을 넣는다
  password: qwer1234            # admin 의 패스워드와 동일
---
apiVersion: trident.netapp.io/v1
kind: TridentBackendConfig
metadata:
  name: backend-tbc-ontap-nas
spec:
  version: 1
  backendName: ontap-san-backend
  storageDriverName: ontap-nas
  managementLIF: 172.31.52.80   # SVM Management의 IP
  dataLIF: 172.31.50.67         # NFS IP
  svm: svm_netappCluster        # https://<SVM_MANAGEMENT_IP>/api/svm/svms 에서 확인한 name 값
  credentials:
name: backend-tbc-ontap-nas-secretkubectl -n trident apply -f trident-backend.yaml
# 배포 결과 확인
kubectl -n trident get tbc backend-tbc-ontap-san -o wide3. StorageClass 생성
# storage-class-netapp.yaml
apiVersion: storage.k8s.io/v1
kind: StorageClass
metadata:
  name: netapp-csi
provisioner: csi.trident.netapp.io
mountOptions:
  - nfsvers=4.1
parameters:
  backendType: "ontap-nas"
allowVolumeExpansion: true
volumeBindingMode: Immediate
reclaimPolicy: Retainkubectl apply -f storage-class-netapp.yaml4. PVC 연동 테스트
# pvc-sample.yaml
apiVersion: v1
kind: PersistentVolumeClaim
metadata:
  name: netapp-pvc
  namespace: default
spec:
  accessModes:
    - ReadWriteMany
  resources:
    requests:
      storage: 10Gi
storageClassName: netapp-csikubectl apply -f pvc-sample.yaml
Trident 제거
1. tridentctl 이용
NetApp CSI, Trident Operator & Orchestrator 외 추가로 tridentctl 설치가 필요하다.
# cd /PATH/TO/TRIDENT-INSTALL-DIRECTORY/
./tridentctl uninstall -n trident2. kubectl 이용 수동 삭제
kubectl patch torc trident --type=merge -p '{"spec":{"uninstall":true}}'
kubectl delete -f deploy/<bundle.yaml> -n trident3. trident namespace 삭제가 안되는 경우 추가 설정이 필요한 부분
namespace 삭제 과정에서 Holding된 경우 Orchestrator가 자체적으로 생성한 Trident Object 중에 Finalizer가 설정된 리소스를 수동으로 제거해야 한다.
- namespace 삭제 중 Holding 걸린 상태의 원인 조회
# Namespace 상태 조회
$ kubectl describe ns trident
Name:         trident
Labels:       kubernetes.io/metadata.name=trident
              pod-security.kubernetes.io/enforce=privileged
Annotations:  <none>
Status:       Terminating
Conditions:
  Type                                         Status  LastTransitionTime               Reason                Message
  ----                                         ------  ------------------               ------                -------
  NamespaceDeletionDiscoveryFailure            False   Fri, 27 Jun 2025 05:30:13 +0000  ResourcesDiscovered   All resources successfully discovered
  NamespaceDeletionGroupVersionParsingFailure  False   Fri, 27 Jun 2025 05:30:13 +0000  ParsedGroupVersions   All legacy kube types successfully parsed
  NamespaceDeletionContentFailure              False   Fri, 27 Jun 2025 05:30:13 +0000  ContentDeleted        All content successfully deleted, may be waiting on finalization
  NamespaceContentRemaining                    True    Fri, 27 Jun 2025 05:30:13 +0000  SomeResourcesRemain   Some resources are remaining: tridentnodes.trident.netapp.io has 3 resource instances, tridentversions.trident.netapp.io has 1 resource instances
NamespaceFinalizersRemaining True Fri, 27 Jun 2025 05:30:13 +0000 SomeFinalizersRemain Some content in the namespace has finalizers remaining: trident.netapp.io in 4 resource instances# 남아 있는 리소스 목록 조회
$ kubectl get trident -n trident
NAME VERSION
tridentversion.trident.netapp.io/trident 24.10.0
NAME AGE
tridentnode.trident.netapp.io/master 24d
tridentnode.trident.netapp.io/worker01 24d
tridentnode.trident.netapp.io/worker02 24d- 삭제 방법
# finalizer 제거
$ kubectl edit tridenversion -n trident trident 	# 편집 화면에서 finalizers 제거
$ kubectl edit tridennode -n trident master			# 편집 화면에서 finalizers 제거
$ kubectl edit tridennode -n trident worker01		# 편집 화면에서 finalizers 제거
$ kubectl edit tridennode -n trident worker01 # 편집 화면에서 finalizers 제거'Container > Kubernetes' 카테고리의 다른 글
| [Kubernetes] NFS CSI (0) | 2025.12.08 |
|---|---|
| [Kubernetes] Secret 이용 Private Registry 인증정보 설정 (0) | 2025.04.02 |
| [Kubernetes] Kubespray로 k8s 설치 (0) | 2025.03.31 |
| [Kubernetes] StatefulSets and PersistentVolume YAML Sample (0) | 2025.03.24 |
| [Kubernetes] DaemonSet YAML Sample (0) | 2025.03.24 |